
Running FreePBX with a docker container
Click here to download FreePBX and Asterisk zip file image from google drive.
This image is large (1.4GB zipped, tar file 4GB) and contains the following:
- FreePBX +
- Asterisk 20.7.0
- Fail2Ban ready and configured to work with FreePBX. Ban IP’s on 3 max wrong SIP register/invite tries.
- unixODBC ready and configured to work with FreePBX
- Posfix configured and ready to use an SMTP server and let sendmail and asterisk to send mails. with a setup script.
1. Download and unzip the .zip file, you will get the tar of the image. Import the image into docker
sudo docker load -i /path/to/your/freepbx.tar2. List your images to see the newly added image name
sudo docker images3. Run the container, preferably with macvlan network
Because telephony requires a lot of ports it is not advised to use -expose, neither iptables, instead use macvlan, read this article on how to setup a server container
sudo docker run -d --network=mymacvlan --name=asterisk --ip 192.168.1.2 --cap-add=NET_ADMIN --cap-add=NET_RAW -it asterisk_image:latest4. Re-compile asterisk to make sure it will be running on your system, type the following command
sudo docker exec -it asterisk bash -c "\
cd /home/user1/asterisk-20.7.0 && \
service asterisk stop || true && \
./configure && make -j2 && \
make install && \
chown -R asterisk.asterisk /etc/asterisk && \
chown -R asterisk.asterisk /var/{lib,log,spool}/asterisk && \
chown -R asterisk.asterisk /usr/lib/asterisk && \
fwconsole chown && \
service asterisk start && \
cd /home/user1 && \
bash"
Now that you are inside the container in /home/user1 folder, you can setup to use an SMTP server to be able to send mails from asterisk if you like by the following command
./setupSMTP.sh [email] [username] [password] [server] [port]
./setupSMTP.sh mail@example.com mail@example.com 12345 mail.example.com 465And that’s all, by now you must have a fully functional FreePBX/Asterisk stack inside your container. Make sure that you have setup your network correctly. Again more information about that on this article.
Extra information:
Installing Another version of Asterisk
The image in this google Drive – Article, has an asterisk version of Asterisk 20.7.0, configured and ready to be installed. However, if you would like to download a new Asterisk version you will have to reconfigure everything your self, bellow are some tips on how to do it your self.
1. Enter in the container bash
sudo docker exec -it <container_name_or_id> bash2. Download and untar the latest asterisk 20
wget https://downloads.asterisk.org/pub/telephony/asterisk/asterisk-20-current.tar.gz
tar xzvf asterisk-20-current.tar.gz
3. Cd into the folder and configure:
cd asterisk-20.7.0
contrib/scripts/get_mp3_source.sh
contrib/scripts/install_prereq install
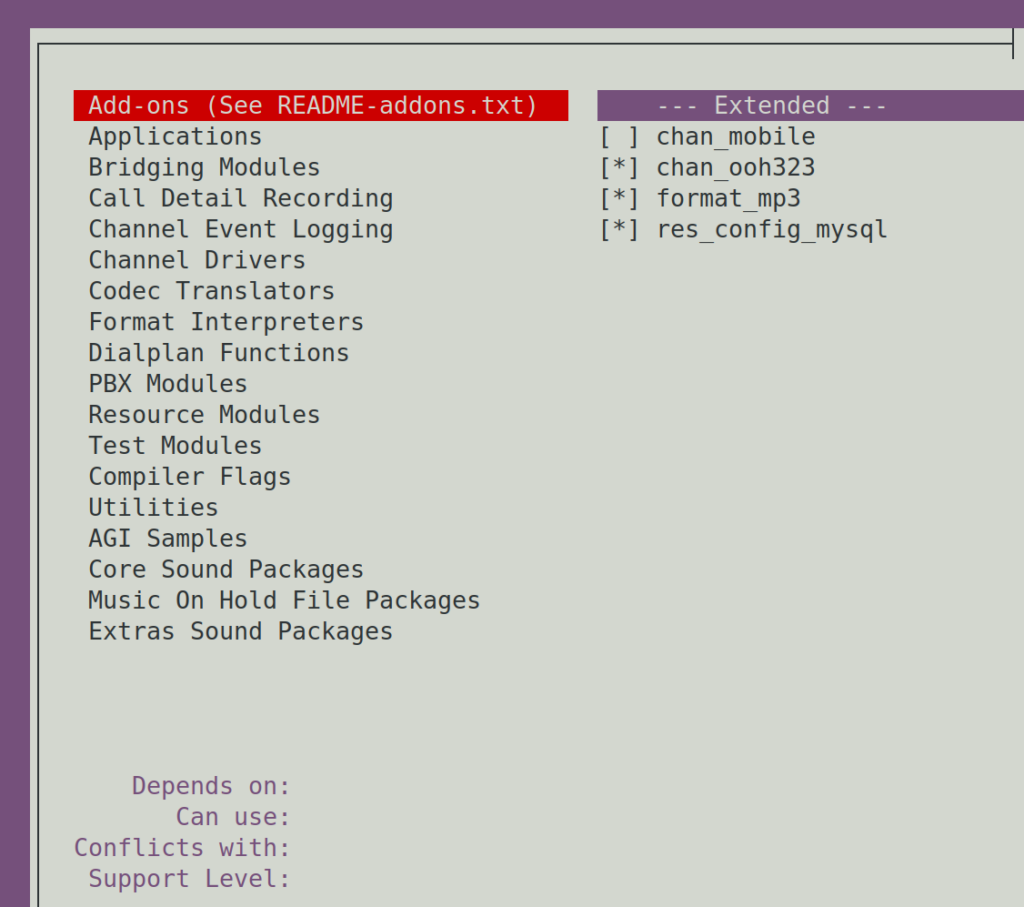
./configuremake menuselectFrom menu config select these:
From Add-Ons Menu Check:
- chan_mobile
- chan_ooh323
- format_mp3
- res_config_mysql
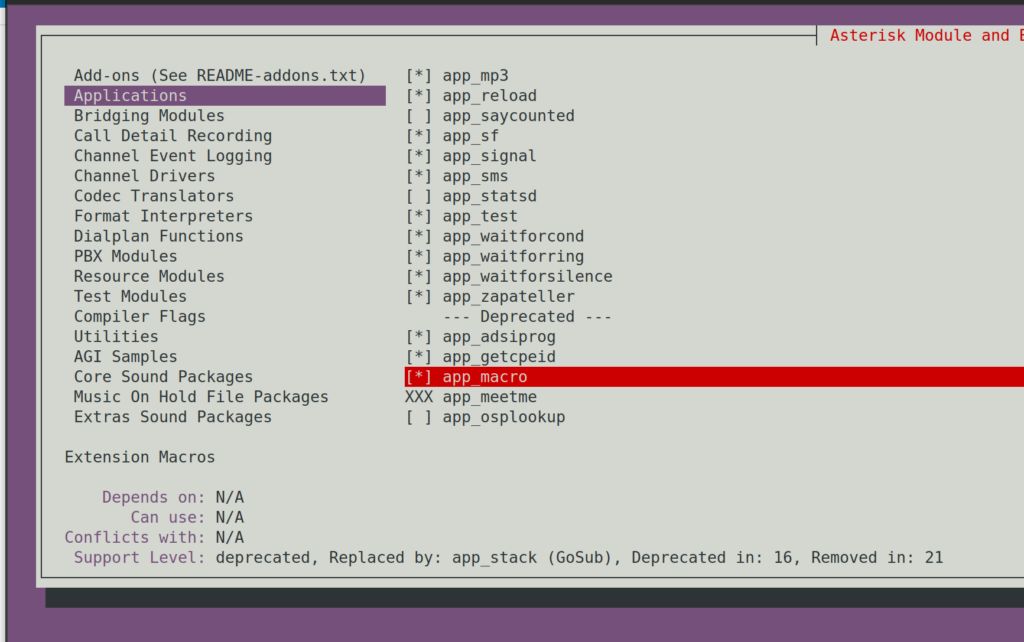
From Applications scroll down a lot in the list, to find and check and Check:
- app_macro
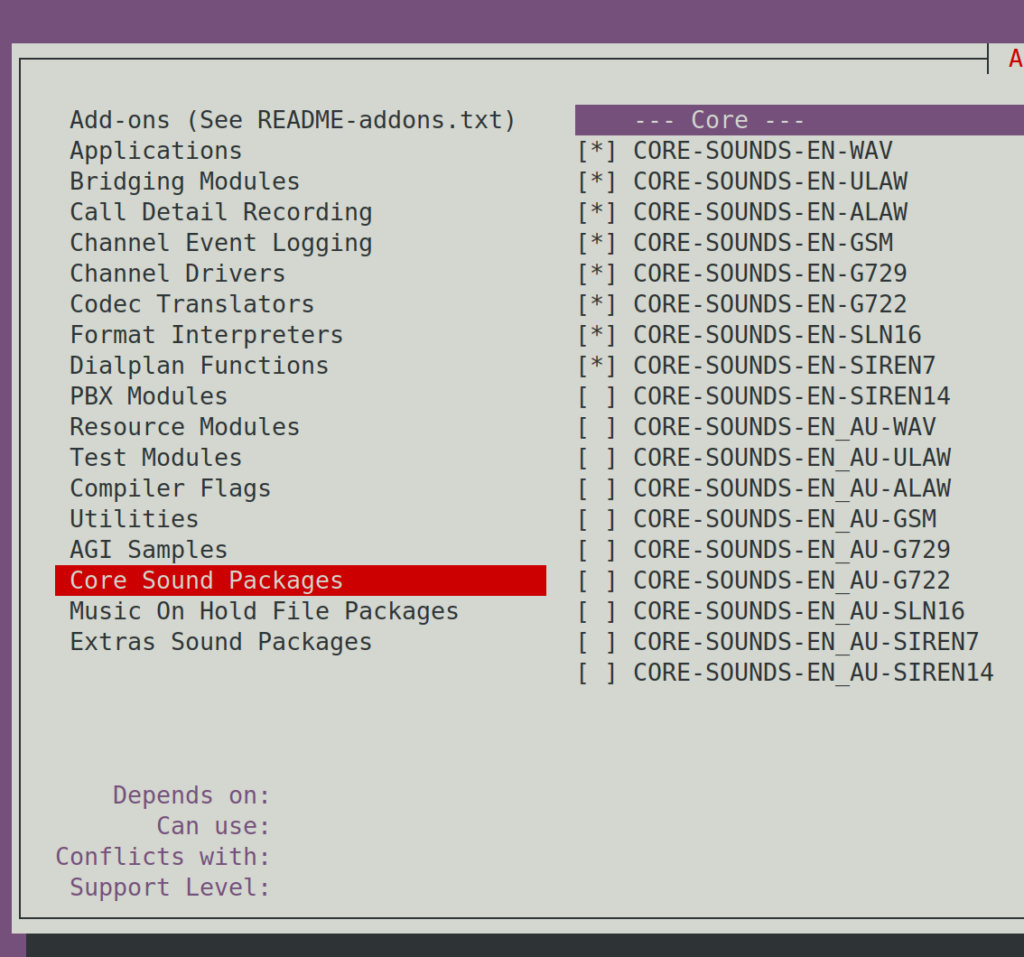
From Core Sounds :check everything down to EN-Siren7
From Music On Hold File Packages: check everything down to EN-G729
From Extra File Packages: check everything down to EN-G729 as well
Or just follow the screenshots bellow:
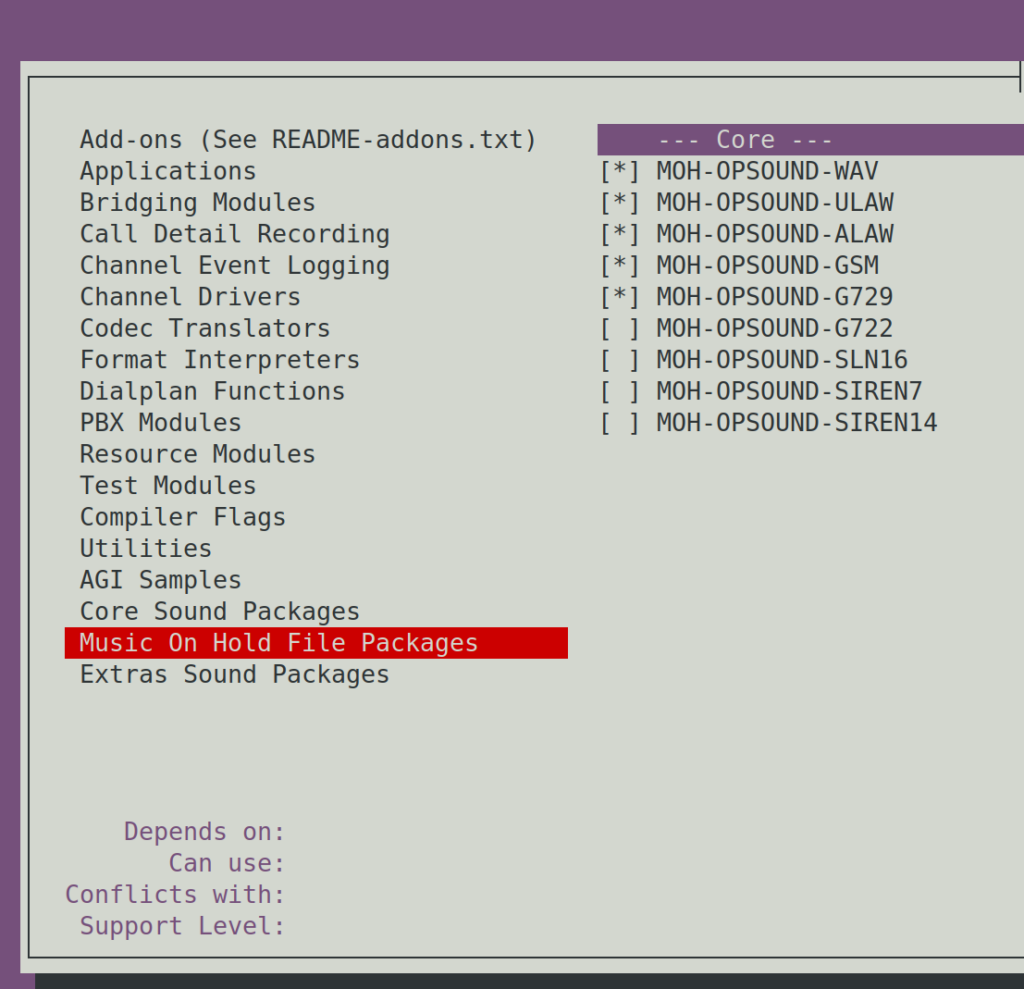
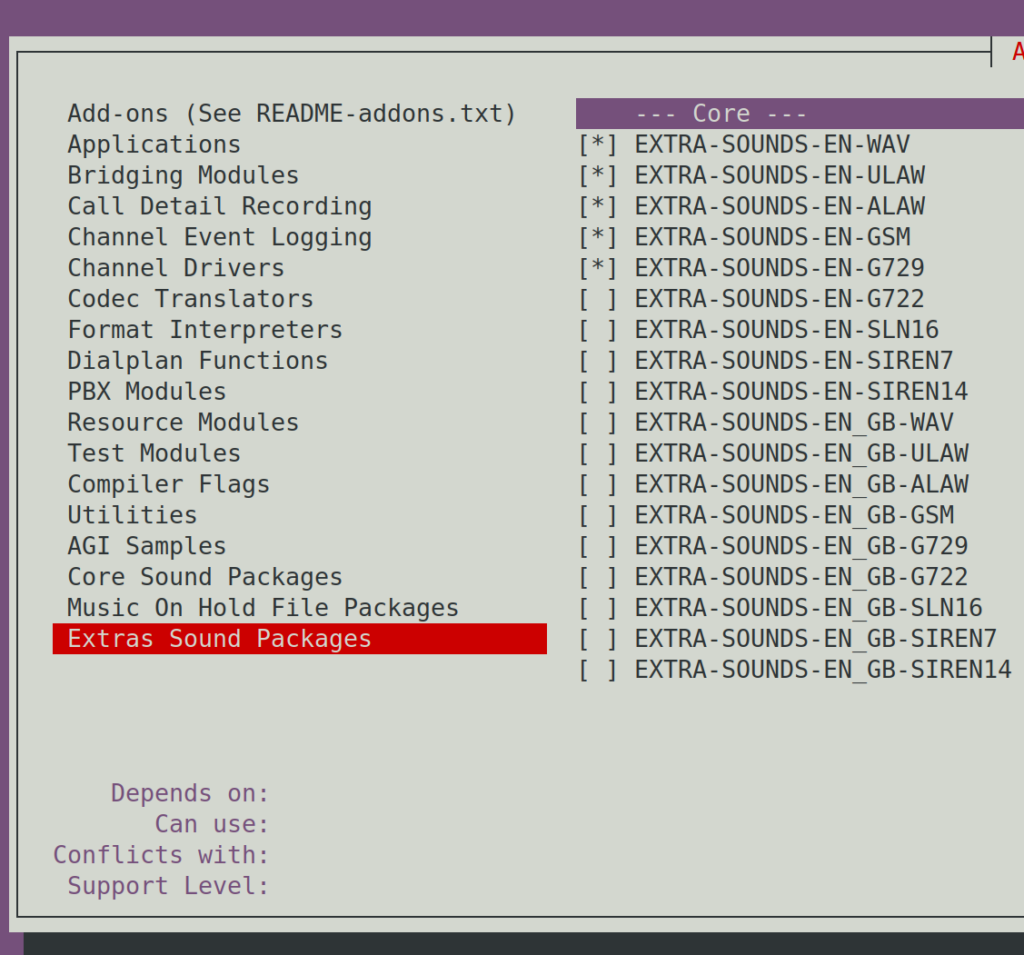
Press Save & Exit, or F12
4. Compile and install
make -j2 && make install
chown -R asterisk.asterisk /etc/asterisk
chown -R asterisk.asterisk /var/{lib,log,spool}/asterisk
chown -R asterisk.asterisk /usr/lib/asterisk
fwconsole chown
5. Run Asterisk
/etc/init.d/asterisk startWrong Password on phone? Its going to get BANNED!
As i mentioned earlier fail2ban is installed and configured in that image to work with FreePBX/Asterisk for the reason that we assume an exposed telephony network that has port forwarding or no firewall in order to let other softphones or hard phones to connect to the system from the outside world of the internet, If you don’t plan to use the system from outside of your local network, then uninstall fail2ban ( systemctl stop fail2ban && apt-get purge fail2ban) , as it is safe, otherwise if you don’t add your local networks into the exceptions, up to 3 wrong passwords or so, then the phones are going to get banned from the asterisk, rendering them unable to connect again..
For that reason, you need to know before hand your network topology /IP addresses, and add these to the exception list of fail2ban, so the local networks can have wrong passwords without getting banned.
How to add Fail2ban exception for my IP
Open file /etc/fail2ban/jail.conf and add your IP to “ignoreip” line which is under [DEFAULT] section.
nano /etc/fail2ban/jail.conf While you are inside nano, press CTRL+W to search for ‘ignoreip’ then ENTER
remove the #, to uncomment the line #ignoreip = 127.0.0.1/8 ::1
And then change it for your own network, for example
ignoreip = 192.168.0.1/24 10.0.0.0/8 127.0.0.1/8 172.16.0.0/12 213.197.141.162Then just press CTRL+O and ENTER and then CTRL+X to exit nano
Then restart the fail2ban to apply the changes
service fail2ban restartDouble Extras
The main problem a newbie may face when trying to set up a telephony system is that the inability to connect soft-phones or phones from the outside (internet) to the inside, for those who intent to use the system as an online internet phone server, in other words,the system may work fine in the local network but the soft-pone wont connect or experience troubles connecting from mobile 4G or 5G or other WiFi remotely, then these are the things you need to check to trouble-shoot that case:
- Make sure your router is not an ISP router but an after market quality router, ISP routers tend to ship with ALG enabled “Application-layer Gateway” but regardless if you find the setting on your router and disable it or not, if it is an ISP router, you are just out of luck, because most of the ISP routers I’ve seen they have some short of an ‘ALG’ setting embedded into the core of their firmware, rendering it impossible to disable it not matter what you do, they will always try to forward UDP packets to their self, simply because they are designed to provide POTS as a VOIP server themselves, so they will consider all the voip related traffic as their (own traffic) and will not allow it to be forwarded to your servers.
- Make sure you know how to use network monitoring tools like WireShark and inspect the TCP/UDP traffic when you run into such issues as the mentioned above
- Make sure you have a good understand of the network protocols, NAT’ing, Routing, etc, in order to setup the asterisk configuration correctly and configure each individual extension settings according the extension’s indented use (internet softphone/phone or local network phone?) each extension may need special settings in their configuration to resolve potential issues like ‘missing sound’
- Thats to make this article as newbie-friendly as possible, if you are a newbie you going to need lots of coffees and time and from now on, ChatGPT and Google is your friend and don’t forget https://community.freepbx.org/ is a nice place to make new friends find help and start asking questions about trouble-shooting problems,
If you found this information here useful and you done your job, or even if you have suggestions or ideas to make it even better, maybe alternative image, etc.. take a few moments to leave me a comment bellow for some feedback. I would love to hear any noise from you.
That was all kiddos, until next time.